Posts Tagged ‘Earthbox’

The eBucket –“Feeding the World, One eBucket at a Time”

Dave’s Garden is one of my favorite gardening forums; members exchange pictures, ideas, and encouragement on myriads of subjects.

Build a better bucket was the challenge

Self-contained box gardens has attracted a lot of attention.  This method of growing vegetables in containers  is of special interest;  many people want to grow fresh vegetables in limited spaces.

Several participants were discussing ways to make  self watering containers so the average Joe  (or Josephine) would not have to shell out big cash or have an engineering degree to build.

There are  how-to instructions on the internet;  they,  generally,  entail  use of larger storage containers, then making  fairly elaborate modifications  like  cutting material for a false bottom, adding baskets and drilling numberless  holes.

Compared to commercially available units these are economical and effective.  They are also heavy and awkward to handle if you are  older and not a strong as you  were in younger days.

Several members had used a design incorporating two five gallon buckets—one as a reservoir and the other as a container for the potting mix.  The disadvantage was the problem involved in moving the container once it was full and not disturbing necessary alignment.

What if just one bucket is used?  Mental wheels started turning.  Now the challenge was to create a workable reservoir for the unit.

Members  wanted simple,  with this false bottom idea, the suggestions  got really creative (and complicated) until a forum member from the Virgin Islands asked a simple question:

“How about using a plastic colander somehow? The kitchen bowl with all the holes in the bottom…”

An hour later the reply to the post came  from South Carolina (USA):

“You know, that just might work. I’m going to see what I can come up with.”

So  July 7, 2009 at 5:51 PM it all began.  Next day came a message from Houston, Texas (USA) sharing an experiment using the bucket design.   She would become the number one spokesperson and promoter of eBuckets.

Through the internet, a team  formed that would present a new concept in bucket gardening construction.

Give a man a cabbage; teach him to grow it in an eBucket

In less than a year the simplicity and the economic value of this design is touted nationally via internet forum and blogs.

This email from an enthusiastic veteran of two  seasons of growth using eBuckets is typical of the positive response it is generating.

“Feeding the world, one eBucket at a time!”

I’m not sure the designers truly understand  what they have done and how far  the design goes.

The eBucket does far more than  “build a better bucket”.    It  creates a  life of empowerment for  many hurting people!

Just read the gardening forums.    One can sense in these  communications so many unspoken words from people

Simple, economical, effective--the eBucket components

affected mightily by this fickle economy:   “too expensive at the store… Putting extra on the table… Grow it myself…”  Many are older, retired, and living on fixed incomes.

The  eBucket  provides a simple, efficient, inexpensive way for people to capture a little more control over uncertain futures.    The design is VERY affordable and unobtrusive.

It is more than people just liking the eBuckets –people NEED the eBucket… it fills  this need, at the right time.

I am promoting the  theme “Feeding the world, one eBucket at a time!” to let people know there is something they can do to make their lives a little better.

—————————————————————-

Detailed instructions for construction and planting the eBucket are available  no cost.

Become a part of “Feeding the world, one eBucket at a time!”

Frugal Gardener: Spring planting experiment – Cabbage

The winter of 2009-2010 was one of the worst South Carolina gardeners have witnessed in many years.

Unpredictable, unusual, unnerving are  descriptive of the weather.   Frustrated describes the gardener, itching to get dirt under his fingernails preparing the soil for crops to come.  Heavy snow in early February,  then constant heavy rain were causes of concern.

Mud meant no cultivation of any type–thus no early spring cool weather vegetables.

A warm period the last week in February, 2010 convinced me I just might be able to plant something in Ebuckets, and self watering bins; maybe, one raised bed was workable.

I checked.  Guess what?  Pay dirt!!

Having  never done  cool weather planting, I decided  to test some of my theories.

I would  use a 9 plant pack each of Golden Cross cabbage, Georgia collards, Bibb lettuce, and  Red Sail Lettuce   planted in   Ebuckets, self contained bins, and raised bed using square foot spacing to compare results.

Collards, cabbage and lettuce in raised bed

The ground was very wet, but one of the raised beds could be worked;  I felt safe planting collards- Georgia (9 in bed) and cabbages -Golden Cross (3 in bed).

I turned soil, racked off weeds, put about 2 cups of pelleted dolomite lime on (3×10) bed. Leveled  a 4 ft x 3 ft  bed area with bagged potting soil and planted  one plant in each 12 inch square  space.

In this 12 square foot area I planted 9 collard and 3 Golden Cross cabbage.

Planting   was done February 20; on March 3 cold snow again covered everything–these  plants survived. Here  is  pictorial history of cabbage and collards in the bed til harvest:

2-21-10 planted in bed 1 plant/12" square

4-1-10 Plants have survived a freezing snow storm and chickens

Rapid growth came as weather conditions warmed in April:

4-9-10 Plenty of rain brings fast growth

This growth is evident less than one week later.   A lot of rain had fallen.

Eleven days later :

4-20-10 Cabbages in rear; lettuce in front

I was very pleased with the performance of the bed with square foot spacing.   After planting I did very little maintenance; not even watering was needed this time of year.

How well  did the self watering  bin succeed?

I planted 6 ea of the Golden Cross in the same self watering  bin  I had used to grow peppers.  Stirred the mix; added about a cup of pelleted dolomite lime and 2 cups 10-10-10 mixed into top 2-3″ of mix. I did put plain mix in holes around plants to keep out of direct contact with fertilizer in soil. Watered around individual plants, through lid.

Here is the Golden Cross cabbage  report.  I forgot to take pictures of the collards, but performance was comparable.

4-9-10 Plenty of rain brings fast growth

4-4-10 Cabbage are pushing for space, 1 did not develop

Compare the growth of this photo  on left with the photo of the bed dated  4-1-10 you will notice an obvious  growth difference .   Next time I will plant 4 plants per self watering  bin.  5 are growing here, but there is definite pushing outward.

Began harvesting collards on 4-20-10; these cabbage are beginning to head:

4-20-10 Close up of Golden Cross in bin

I am  convinced that self watering containers are the answer to many gardening problems.   Growth is much better; I have had absolutely no insect problems; once the containers are  planted  watering is the only maintenance.

The plants in the bed and the ones in the self watering  bin came from the same 9 plant pack; they were planted the same day and grew side by side.

I caution that I do not use a studied approach to adding dolomite lime, epsom salts, or fertilizer to my plantings.    My by gosh, by golly approach is probably not the one you would want to emulate, it works for me; I am not a purist!

Pushing Spring

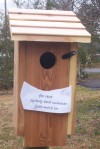
empty bluebird house with sign

It's all ready for the spring and summer residents

It is that time of year again!    I will not say  I have cabin fever; just know I can not believe it is mid February; my fingers  are aching to feel dirt under these ragged nails.

The past four days feel like spring; to heck with the fact  a week ago the ground was covered with an unprecedented level  fluffy soft white stuff– 5 inches worth at my house.

It was gone in a day’s time.  Then the itch set in.

First I see a flock of robins  (actually around a patch of snow).   Talk about a sign of spring! Then I notice the elm tree buds swelling.

Thoughts  turn to our family of bluebirds who occupy our nesting box every year.  The old box has seen  it’s better days after 4 years, so got a brand new cedar one ready.  Hope it is not too high class for my country pair.

I can not wait to get started with the outside garden.   For some reason I have had it in my head that the last frost is about 6 weeks away and mentally have been planning in that direction.  When I was driving  to the garden center a couple days ago,my poor aging brain suddenly calculated,  officially the last killing frost is about April 15.   This is mid February, officially  there are 2 whole months til spring planting time.

“NO WAY!!  I ain’t going to wait that long!  I won’t, I got to have  a dirt grubbing, finger nail busting  fix NOW!!”

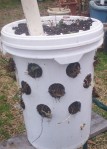
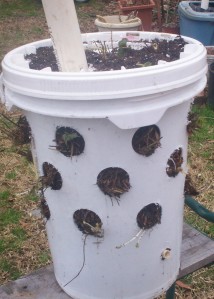
strawberrry bucket

15 Tristar and 10 Quinault strawberries and a lot of hope

Whew! thank goodness, I know about alternative gardening methods.   Fixed up a new fangled strawberry bucket. Twenty five strawberry plants later I am on my way to spring time!  That did not calm my dirt grubbing craving though; it just added fuel to the urge.

Limited (but very successful)  Ebucket and homemade earthbox trials last year give me great hopes for this year. Dreams of oodles of heirloom tomatoes, squash, cucumbers, and corn fill my head.

Really jumped the gun; started  9 varieties of heirloom tomatoes early February.   They are up and going; along with some heirloom pepper.   Only have room for 2 plants each variety so planted what I thought was 5 seeds of each; imagine my surprise when from 6-8 plants showed

Heirloom tomatoes--I planned 5 each but Surprise!!

for most of the varieties.  I did not realize seeds could stick together so well they look like a single seed.  Maybe some lucky souls will accept gift plants.    The challenge now will be to keep them growing til the warm weather comes.

Well, swell, I know what I will do.  Never planted a winter garden.  I do have raised beds I have been working with for several years, wonder if I might be able to plant something in one of them?

Bingo!!

Using the square foot gardening idea on a 3 x 10 foot raised bed I am beginning;  9 Georgia collards and 3 Golden Cross cabbage, I am off and running.   Experimenting with an earthbox for 6 of the cabbage.

6 Golden Cross cabbages in earthbox

Last year’s crops taught me not to pooh pooh close planting.  Can’t argue with over a

Collards and cabbage using square foot garden spacing

dozen beautiful ears of corn from a 10 gallon earthbox or one pound size tomatoes from 2  ten foot (plus) vines growing in a 10 gallon box!

How innocently it started.  Now I am planning beets, carrots, chard, lettuce and spinach.   It is late, but I am going to plant garlic cloves, maybe some onions and potatoes.

My enthusiasm for herbs has been fanned as well.   Started, already, are oregano, mint, thyme, parsley.   I enjoy the fruit smells of scented plants so here I go in that direction as well.

Like a kid at Christmas time with dreams of sugar plums dancing in his head, this old geezer dreams of tomatoes, squash, cucumbers, and corn and Spring that is on it’s way.

——————————————————————

A note: just saw our mama bluebird checking out the new condo; maybe her family will move in and I can change the sign to “occupied”.

Come on Spring, come on!

Frugal Gardener: Strawberry eBucket

When even a hint of spring comes each year my mind seems to gravitate toward some new experiment in my garden.

If my memory serves me right, when I was younger, my thoughts turned in another direction, but dang, I can not remember which, so I’ll settle for the stimulation of the garden, I guess.

In all this crazy weather this year we have suddenly had a week of warm sunny weather that got me outside cleaning, clearing and wanting to plant.   The land is far too wet, it is like a swamp actually, when I was setting up my Ebuckets that grew  so well last season, the idea hit.

Why not try growing strawberries in a modified Ebucket?  After all, you can grow the berries  in planting bags.  So I set about creating my strawberry bucket.

Last fall a  neighbor gave me some plastic buckets used to store swimming pool chemical.  They are 12″ diameter buckets  but are deeper than a standard 5 gallon bucket—-perfect for what I have in mind.

I am going to put a series of 2 inch holes around the side of the bucket; holes centered approximately 5 inches apart.  Since a 12 inch bucket has a circumference of approximately 36 inches I can put 7 holes in each staggered row;  three rows, plus 4 holes in the lid of the Ebucket will accommodate 25 plants;  this is the standard unit of sales for most plants.

Setup for this strawberry bucket is the same as the standard Ebucket ; very simple to assemble.   All you need is 1 plastic bucket; 1 plastic colander about 12 inches in diameter; a piece of pipe 2 – 3 inches taller than your container for the fill pipe, and on this bucket I used a 1/2 inch piece of pipe to make a overflow valve on bottom of my strawberry pail.

My first row of planting holes are about 4 inches from the top of my container; simply measure down about 5 inches for  the first center.   Measure over about 5 inches to center the next hole and drill away.  You will probably have 7 holes; now drop down, measure 5 inches to center next row; stagger the spacing so one hole is not directly under another in the row above.  Repeat the process for the third row, that is it!

Planting is simple.  Get your plants ( roots);  most nurseries package in units of 25 plants but I  got what was available locally at Lowe’s and Wallyworld;  a box of 20  Tristar and bag of 10 Quinault (cost $13).  You’ll need your favorite container potting mix.

Strawberry Ebucket

Strawberry Ebucket

Fill and pack your potting mix around the colander to just over the colander  for effective wicking.   Continue filling (but  not packing)  mix to the level of the bottom row of planting holes;  separate your roots and lay them on top of layer of mix.  Be sure not to bury neck of crown, let it lie on edge of hole.

You will need to place some material over the plant at the hole entrance to keep mixture from coming out; I put some wood mulch over the hole just inside the bucket; worked great.

Cover this row of plants with mix to the level of the next row up; gently pat mix  and  water gently to settle in; I had put a gallon of water in the colander after I seated it;  I water the first row  til water flows from the overflow pipe.

Repeat process until all plants are in place.   I filled my bucket completely with mix since I am using that space on top  to set 4 plants — total  25 in the Ebucket.

There are few things I have done differently.  After reading and looking at other self-watering set ups, I have come to the conclusion the there are no hard and fast rules regarding soil and fertilizers.

The  EARTHBOX®  advertising has convinced many that the fertilizer has to be a certain  kind applied in a particular manner;  we are assured that no additives can be used in the soil  mix.   Experimentation shows this is not the case.  So…………

The basic mix must stay fluffy,  beyond that there are countless variations.  I am using a container  potting mix in this Ebucket that already  has some fertilizer incorporated.  Plan to supplement with liquid “teas” as the plants grow.

Will my Ebucket work with strawberries; I hope so; we will see.

This is what I find interesting about this hobby.

(References are for information only.  I am not associated with companies, nor am I being compensated in any way)

Frugal Gardener: Self Watering eBucket

Please follow this link

I have accidentally deleted this blog from all sites. Please bear with me as I attempt to reconstruct. Sorry for the inconvenience and thank you for your patience.

IF YOU WOULD LIKE TO CHECK THE SOURCE MATERIAL FROM WHICH IT WAS CREATED CHECK THIS FORUM
http://davesgarden.com/community/forums/p.php?pid=6792900

CLICK  “IN REPLY TO: ”  LINE  TO SEE  REST OF ARTICLE